
When developing complex robotic systems, managing the operational state of each node precisely is essential to ensure stability, safety, and predictability.
ROS 2 introduces a key concept to meet this need: Lifecycle Nodes.
Unlike standard nodes, which start operating as soon as they are launched, Lifecycle Nodes allow you to explicitly control their behavior through a series of well-defined states and transitions.
This approach enables developers to decide when a node should activate, when it should stop, and when it should release its resources — offering total control over the system’s behavior.
If you want to first understand the theory behind Lifecycle Nodes and see a Python implementation, check out the related article “Lifecycle Node in Python”, where we explain the core principles of the ROS 2 Lifecycle system.
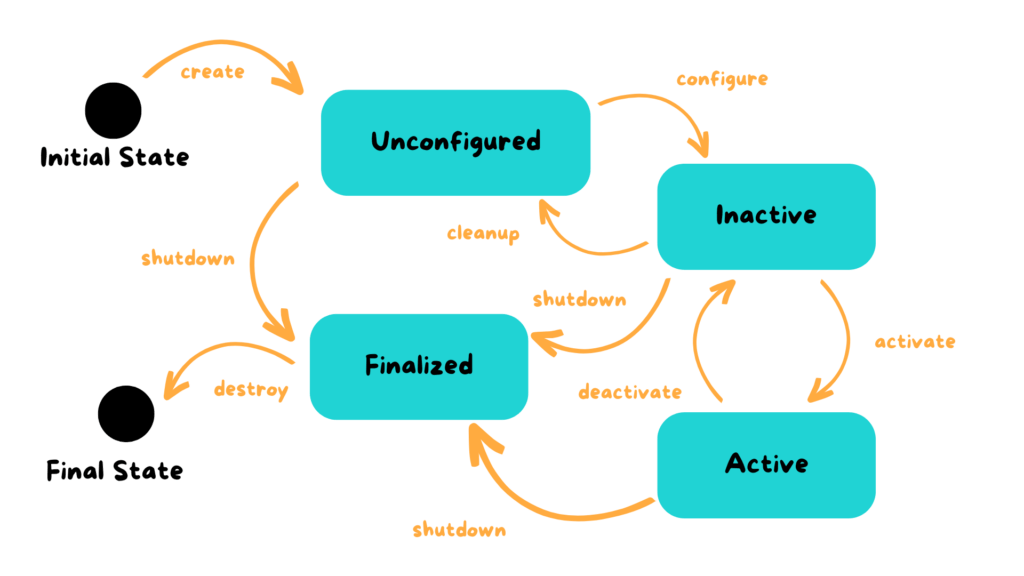
A Lifecycle Node (or managed node) goes through a series of states:
Unconfigured – the node is created but has not yet initialized its resources.
Inactive – the node is configured but not yet publishing or acting.
Active – the node is fully operational and communicating with other system components.
Finalized / Shutdown – the node releases its resources in a controlled shutdown.
Each transition between states can be linked to a callback — a function that defines what happens when the node enters or exits a particular state.
This structured model allows developers to build systems that are more reliable, predictable, and easier to manage, especially in distributed or industrial applications.
Let’s now see how to implement a Lifecycle Node in C++ using the native ROS 2 API.
The following code example comes from the lab L37_C++_Create a Lifecycle Node.
					#include "rclcpp/rclcpp.hpp"
#include "rclcpp_lifecycle/lifecycle_node.hpp"

using rclcpp_lifecycle::LifecycleNode;
using CallbackReturn = rclcpp_lifecycle::node_interfaces::LifecycleNodeInterface::CallbackReturn;

class MyLifecycleNode : public LifecycleNode
{
public:
    explicit MyLifecycleNode(const rclcpp::NodeOptions & options)
    : LifecycleNode("my_lifecycle_node", options)
    {
    }

    CallbackReturn on_configure(const rclcpp_lifecycle::State &)
    {
        RCLCPP_INFO(get_logger(), "Configuring...");
        return CallbackReturn::SUCCESS;
    }

    CallbackReturn on_activate(const rclcpp_lifecycle::State &)
    {
        RCLCPP_INFO(get_logger(), "Activating...");
        return CallbackReturn::SUCCESS;
    }

    CallbackReturn on_deactivate(const rclcpp_lifecycle::State &)
    {
        RCLCPP_INFO(get_logger(), "Deactivating...");
        return CallbackReturn::SUCCESS;
    }

    CallbackReturn on_cleanup(const rclcpp_lifecycle::State &)
    {
        RCLCPP_INFO(get_logger(), "Cleaning up...");
        return CallbackReturn::SUCCESS;
    }

    CallbackReturn on_shutdown(const rclcpp_lifecycle::State &)
    {
        RCLCPP_INFO(get_logger(), "Shutting down...");
        return CallbackReturn::SUCCESS;
    }
};

int main(int argc, char * argv[])
{
    rclcpp::init(argc, argv);
    auto lc_node = std::make_shared<MyLifecycleNode>(rclcpp::NodeOptions());
    rclcpp::spin(lc_node->get_node_base_interface());
    rclcpp::shutdown();
    return 0;
}
					#include "rclcpp/rclcpp.hpp"
#include "rclcpp_lifecycle/lifecycle_node.hpp"
These lines include the core ROS 2 libraries and the lifecycle extension rclcpp_lifecycle, which provides all the tools needed to manage node life cycles.
					using rclcpp_lifecycle::LifecycleNode;
using CallbackReturn = rclcpp_lifecycle::node_interfaces::LifecycleNodeInterface::CallbackReturn;
Here we define shorthand aliases for convenience.LifecycleNode is the base class for managed nodes, while CallbackReturn defines the type that transition callbacks must return.
class MyLifecycleNode : public LifecycleNode
We declare a class named MyLifecycleNode that inherits from LifecycleNode.
This allows us to override the lifecycle callback methods and define custom behaviors for each transition.
					explicit MyLifecycleNode(const rclcpp::NodeOptions & options)
: LifecycleNode("my_lifecycle_node", options)
This constructor initializes the node with the name my_lifecycle_node and applies configuration options.
The explicit keyword prevents implicit conversions, improving code safety.
					CallbackReturn on_configure(const rclcpp_lifecycle::State &)
{
    RCLCPP_INFO(get_logger(), "Configuring...");
    return CallbackReturn::SUCCESS;
}
The on_configure() callback is triggered when the node transitions from unconfigured to inactive.
Here, we would typically load parameters, initialize publishers or resources, and prepare the node for operation.
					CallbackReturn on_activate(const rclcpp_lifecycle::State &)
{
    RCLCPP_INFO(get_logger(), "Activating...");
    return CallbackReturn::SUCCESS;
}
The on_activate() callback runs when the node becomes active.
At this stage, publishers, subscribers, or timers are enabled — the node is now fully operational.
					CallbackReturn on_deactivate(const rclcpp_lifecycle::State &)
{
    RCLCPP_INFO(get_logger(), "Deactivating...");
    return CallbackReturn::SUCCESS;
}
The on_deactivate() callback handles the transition from active to inactive.
It’s used to pause activity while keeping resources available for reactivation.
					CallbackReturn on_cleanup(const rclcpp_lifecycle::State &)
{
    RCLCPP_INFO(get_logger(), "Cleaning up...");
    return CallbackReturn::SUCCESS;
}
The on_cleanup() callback frees resources and resets parameters, returning the node to the unconfigured state — ready for reconfiguration.
					CallbackReturn on_shutdown(const rclcpp_lifecycle::State &)
{
    RCLCPP_INFO(get_logger(), "Shutting down...");
    return CallbackReturn::SUCCESS;
}
The on_shutdown() callback executes during final shutdown.
It’s the ideal place to save data, close files, and release hardware safely.
					int main(int argc, char * argv[])
{
    rclcpp::init(argc, argv);
    auto lc_node = std::make_shared<MyLifecycleNode>(rclcpp::NodeOptions());
    rclcpp::spin(lc_node->get_node_base_interface());
    rclcpp::shutdown();
    return 0;
}
The main() function initializes ROS 2, creates an instance of the node, spins it to keep it running, and then shuts down cleanly.
The spin() call ensures the node stays active until an external shutdown signal is received.
Once the node is running, you can control its state directly from the terminal using ROS 2’s command-line interface.
This tool allows you to move the node between states — ideal for testing or debugging.
					ros2 lifecycle set /my_lifecycle_node configure
ros2 lifecycle set /my_lifecycle_node activate
ros2 lifecycle set /my_lifecycle_node deactivate
ros2 lifecycle set /my_lifecycle_node cleanup
ros2 lifecycle set /my_lifecycle_node shutdown
Each command triggers the corresponding callback in the code.
To check the node’s current state, simply run:
ros2 lifecycle get /my_lifecycle_node
This mechanism makes Lifecycle Nodes perfect for distributed robotics environments where multiple components must be activated and deactivated in a controlled order.
Lifecycle Nodes are one of the most significant advancements of ROS 2 compared to ROS 1.
They provide deterministic control, promote modularity, and ensure system reliability.
In industrial and research applications, they are essential for ensuring that sensors activate only when the system is ready and that actuators deactivate safely.
They also make it possible to dynamically reconfigure systems without restarting the entire application — improving uptime and flexibility.
In this article, we explored how to create and manage a Lifecycle Node in ROS 2 using C++, analyzing the full code and comparing it to the version described in “Lifecycle Node in Python”.
We learned how to define transition callbacks, monitor node states, and use the ROS 2 CLI for lifecycle management.
Scroll down to discover how to access the full course today and take your ROS 2 development to the next level.
Assemble your robot and get started to learn Robotics!