Servo motors are widely used in robotics, automation, and RC models because they can move to specific angles with precision. In this tutorial, you’ll learn how to connect a servo motor to an Arduino Uno and control its position with simple code.
📝 Required Components
1× Arduino Uno
1× Servo Motor (like SG90 or MG90S)
3× Male-to-male jumper wires
1× USB cable for Arduino
📖 How a Servo Motor Works
A servo motor is a small device that can rotate to a specific position and hold it there. It’s different from a regular DC motor, which spins continuously, because a servo moves to a precise angle based on the signal it receives. This makes it perfect for projects where you need accurate control, like moving the arm of a robot or steering a small vehicle.
The servo receives a control signal through a technique called PWM (Pulse Width Modulation). By changing the width of this signal, you tell the servo which angle to move to — typically between 0° and 180°. Inside, the servo has a small motor and a control circuit that interprets the signal and adjusts the position accordingly. Thanks to Arduino’s built-in Servo library, you don’t have to manage these signals manually: you simply tell the servo the angle you want, and the library does the rest.
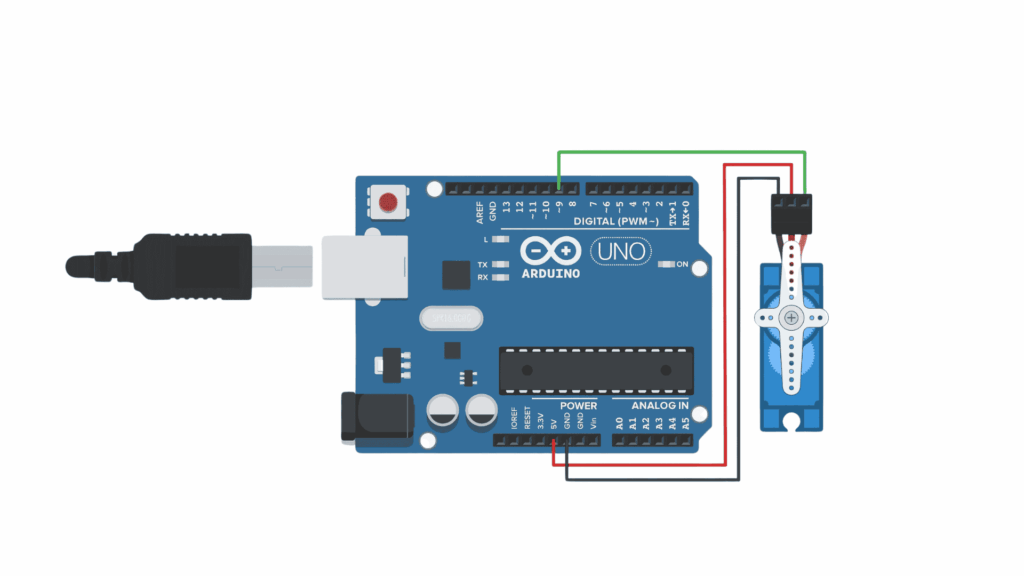
📊 Wiring Connections
Servo Wire
Arduino Uno
Brown/Black (GND)
GND
Red (+5V)
5V
Orange/Yellow (Signal)
Digital pin 9
📦 Complete Arduino Code
We’ll use the built-in Servo library in Arduino IDE to make it easier to control the motor.
					#include <Servo.h>  // Include the Servo library

Servo ServoMotor;   // Create a Servo object

void setup() {
  ServoMotor.attach(9);  // Attach the servo to digital pin 9
}

void loop() {
  ServoMotor.write(0);    // Move to 0 degrees
  delay(1000);            // Wait 1 second

  ServoMotor.write(90);   // Move to 90 degrees
  delay(1000);            // Wait 1 second

  ServoMotor.write(180);  // Move to 180 degrees
  delay(1000);            // Wait 1 second
}
🔎 Breaking down the Code
Let’s review the code section by section:
Include the Servo library
Adds the Servo library, providing functions to control servo motors.
#include <Servo.h>
Create a Servo object
Servo ServoMotor;
Creates a Servo object named ServoMotor to control the motor.
Setup Function
					void setup() {
  ServoMotor.attach(9);
}
Links the servo motor control wire to digital pin 9.