Building Smarter Robots with Behavior Trees in ROS 2 (Step-by-Step)

Discover how Behavior Trees can help you structure intelligent robot behaviors in ROS 2 using modular logic, clear control flow, and intuitive tools like Groot.

🤖 Why Behavior Matters in Robotics

Robots that operate in the real world face much more than just navigation tasks. They need to handle dynamic environments, unpredictable humans, and ambiguous situations.
Think about it: people step in front of delivery bots, block them for fun, or push them just to see what happens.

How can we design robots that are both reliable and flexible in the face of such chaos?
The answer is modular, visual, fault-tolerant logic – in other words, Behavior Trees.

🌳 What Are Behavior Trees?

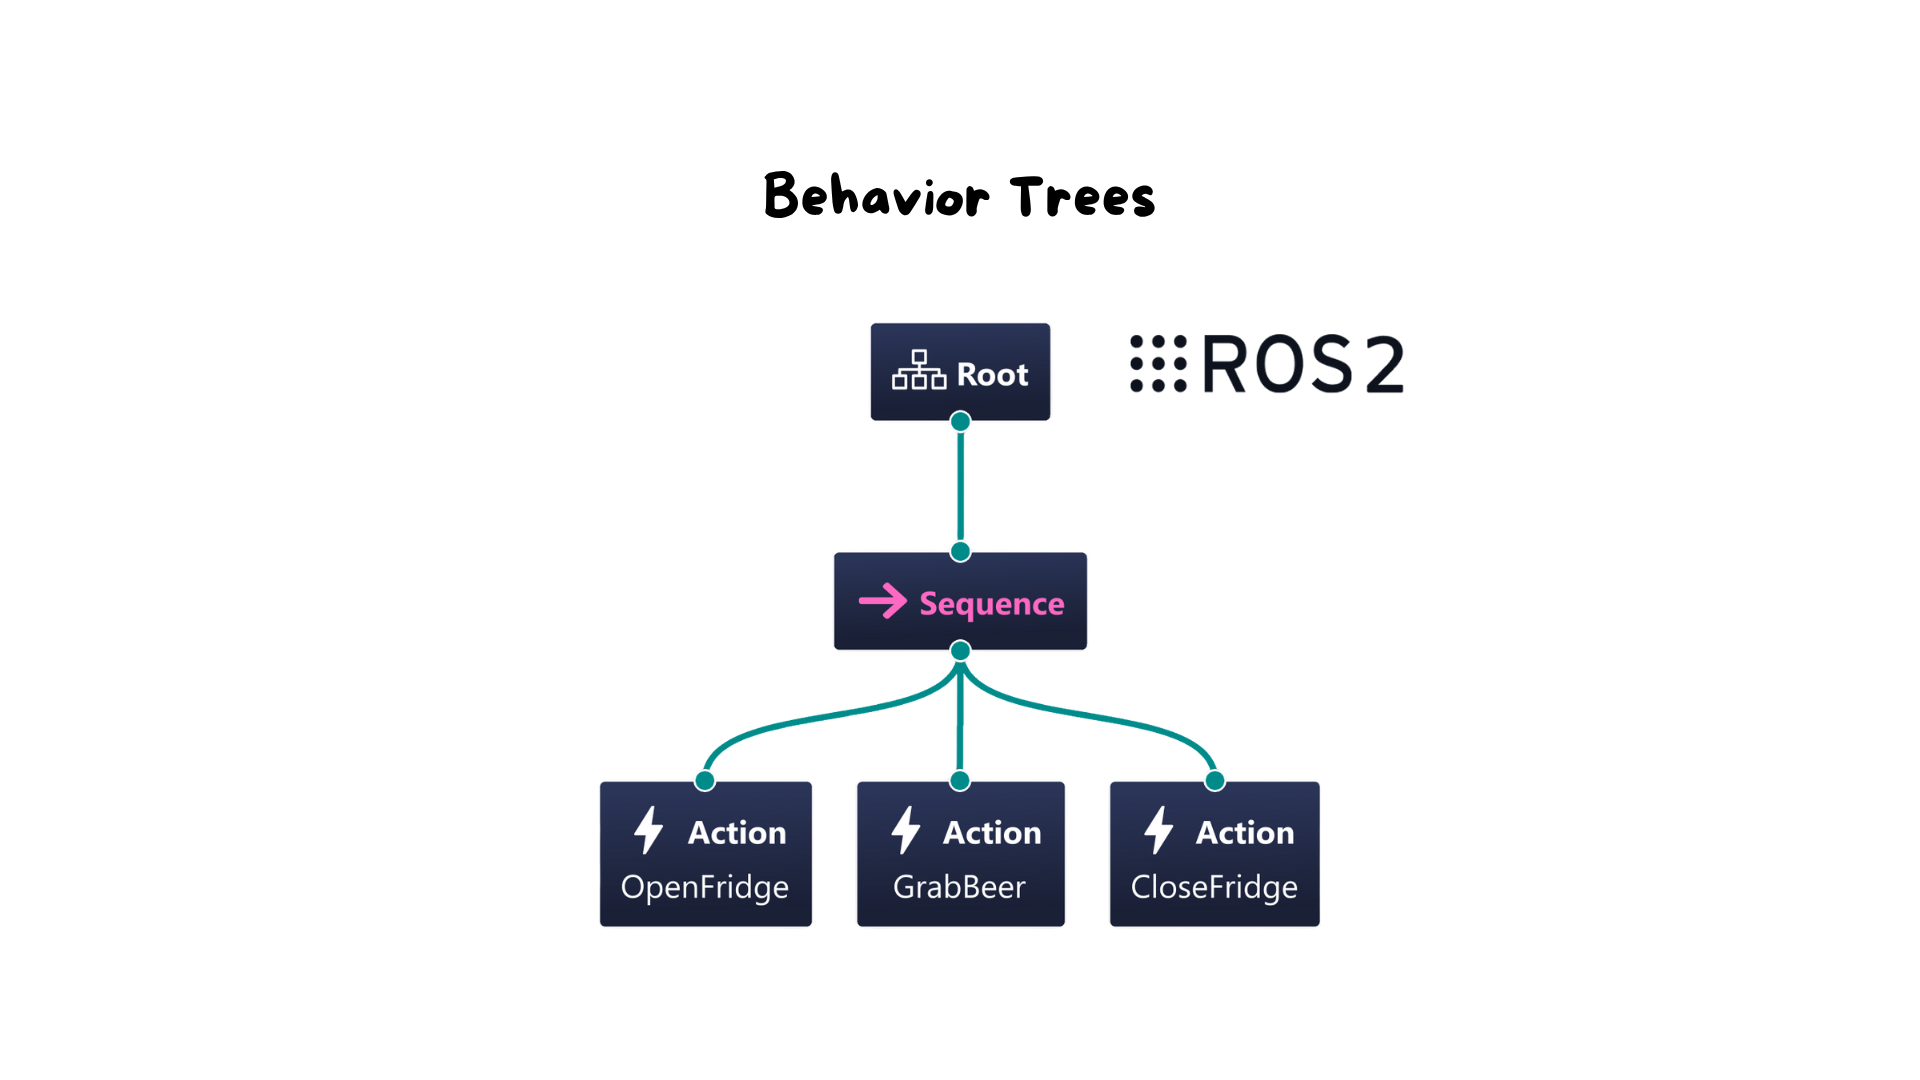
Behavior Trees (BTs) originated in game development, but quickly became a favorite in robotics because of their flexibility and readability. They allow us to compose logic in a structured way using nodes that are easy to understand, reuse, and extend.

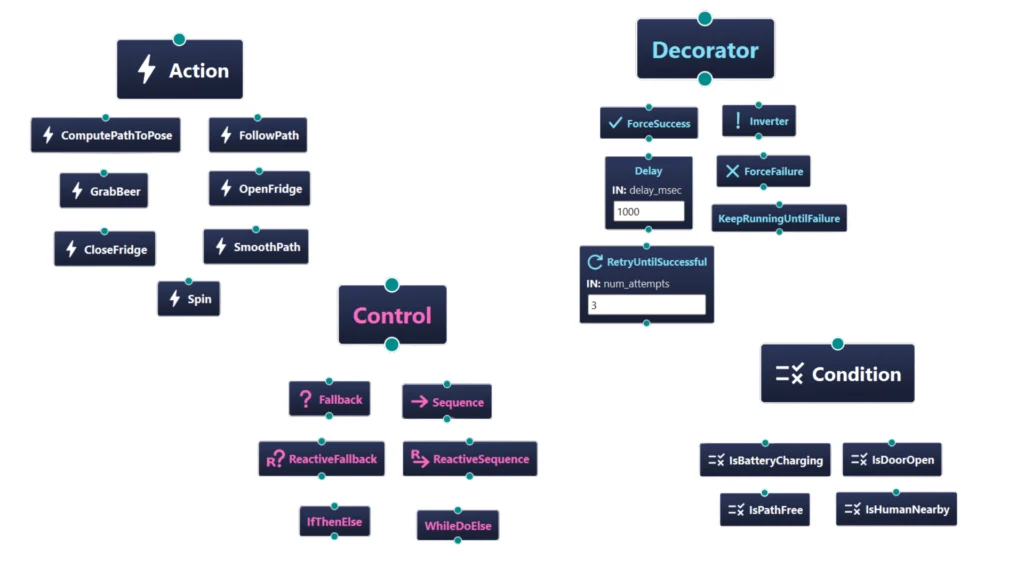
A Behavior Tree is composed of:

  • Action Nodes: they perform tasks

  • Condition Nodes: they check the state of the world

  • Control Nodes: they decide how to organize children (e.g., Sequence, Fallback)

  • Decorator Nodes: they modify the behavior of a single child (e.g., Retry, ForceFailure)

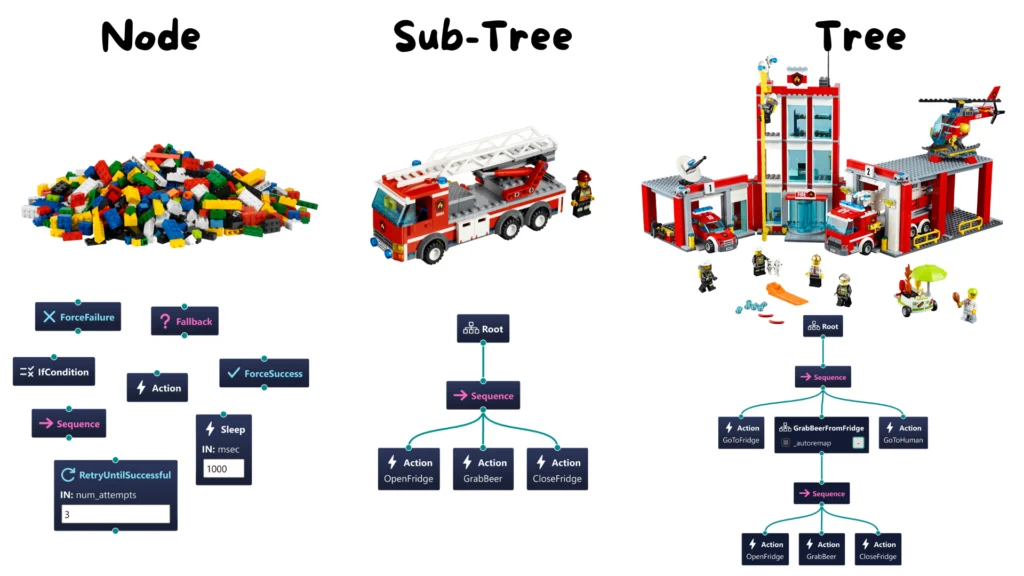
Like LEGO bricks, you can combine these nodes to build behavior that is both powerful and modular.

🧪 Let’s Build Our First Behavior Tree (with Groot)

Once you understand the theory, the next step is hands-on practice.
To create and manage Behavior Trees easily, we’ll use a graphical tool called Groot.

🧰 Installing Groot

Open a terminal and run the following commands to install and launch Groot:

				
					cd ~/Downloads
chmod +x Groot2*.AppImage
./Groot2*.AppImage


📥 Import Nav2 Node Models

Before you start building your navigation logic, you need to import the Nav2 node models into Groot.
You can do this via the GUI by selecting Import Models and choosing:

				
					/opt/ros/jazzy/share/nav2_behavior_tree/behavior_tree_nodes.xml


After this step, you’ll see nodes like:

  • ComputePathToPose

  • FollowPath

  • IsBatteryLow

  • and many more

Now you’re ready to build your first navigation tree.

🛣️ Create a Simple Navigation Tree

Let’s build a tree where the robot does two things:

  1. Compute a path to a goal

  2. Follow that path

🌳 Behavior Tree XML

Here’s the full XML definition:

				
					<root main_tree_to_execute="MainTree">
  <BehaviorTree ID="MainTree">
    <Sequence name="navigate_to_goal">
      <ComputePathToPose goal="{goal}" planner_id="GridBased" path="{path}"/>
      <FollowPath path="{path}" controller_id="FollowPath"/>
    </Sequence>
  </BehaviorTree>
</root>


This Behavior Tree defines a simple sequence to navigate the robot to a goal. The main tree is "MainTree", and it runs a Sequence node called "navigate_to_goal", which executes its children one by one until one fails or all succeed.

The sequence has two actions:

  1. ComputePathToPose: calculates a path from the robot to the target ({goal}) using the "GridBased" planner and stores it in {path}.

  2. FollowPath: takes the generated {path} and commands the robot to follow it using the "FollowPath" controller.

If both actions succeed, the sequence returns success; otherwise, it stops at the first failure.

⚙️ Connect the Tree to ROS 2

Let’s now tell ROS 2 to actually use this tree.

💾 Save the XML file

Save the previous XML code into:

				
					bumperbot_navigation/behavior_tree/simple_navigation.xml


📦 Modify CMakeLists.txt

Add this line to your CMakeLists.txt file to ensure the tree is installed:

				
					install(DIRECTORY behavior_tree/
  DESTINATION share/${PROJECT_NAME}/behavior_tree)


This tells ROS 2 to install the entire behavior_tree folder into the share directory of your package so it’s available at runtime.

🔧 Configure the Behavior Tree path

Edit your bt_navigator.yaml file to include:

				
					default_nav_to_pose_bt_xml: "/home/alien/bumperbot_ws/src/bumperbot_navigation/behavior_tree/simple_navigation.xml"


This sets the Behavior Tree file that Nav2 will load when the bt_navigator node starts.

🚀 Launch the Behavior Tree in ROS 2

We need to include the bt_navigator node in your navigation.launch.py file.

🐍 Add this node

				
					nav2_bt_navigator = Node(
    package="nav2_bt_navigator",
    executable="bt_navigator",
    name="bt_navigator",
    output="screen",
    parameters=[
        os.path.join(
            bumperbot_navigation_pkg,
            "config",
            "bt_navigator.yaml"),
        {"use_sim_time": use_sim_time}
    ],
)

lifecycle_nodes = ["controller_server", "planner_server", "smoother_server", "bt_navigator"]


This snippet launches the bt_navigator node from the nav2_bt_navigator package. The executable is specified as "bt_navigator", and the node name is also set to "bt_navigator". Output is directed to the terminal with output="screen".

It includes a list of parameters, such as the YAML config file and a flag to use simulation time. Finally, the node is added to lifecycle_nodes so it’s managed automatically by the lifecycle manager—ensuring it’s properly configured and activated during startup.

🧪 Build and Run

Now build the workspace and run everything:

				
					cd bumperbot_ws
colcon build

. install/setup.bash
ros2 launch bumperbot_bringup simulated_robot.launch.py world_name:=small_house

. install/setup.bash
ros2 launch bumperbot_navigation navigation.launch.py


🧭 Visualize the Robot’s Behavior

Open RViz and load the default Nav2 configuration:

				
					/opt/ros/jazzy/share/nav2_bringup/rviz/nav2_default_view.rviz


Use the Nav2 Goal tool to send a target pose. The robot will:

  • Plan a path

  • Follow the path

  • And if the path is invalid, the tree will return FAILURE and stop

🎯 Conclusion

Behavior Trees give us a powerful way to write robust and reusable logic for autonomous robots.
By using Groot, ROS 2, and Nav2’s BT system, we can build logic that:

  • Fails gracefully

  • Can be visualized and debugged

  • Is easy to extend with recovery behaviors, safety checks, and more

Want to learn more?

Explore all the ROS2 services in the "Robotics and ROS 2 - Learn by Doing! Monipulators" course
DISCOUNT
es_ES