
When developing complex robotic systems, the ability to precisely control the operational state of each node is essential to ensure reliability, safety, and maintainability. ROS 2 addresses this need through a key concept: Lifecycle Nodes.
Unlike regular nodes that start operating as soon as they are launched, Lifecycle Nodes allow you to manage their life cycle through well-defined states and transitions. This means you can decide when a node should start working, when it should pause, and when it should shut down, giving you complete control over the system’s behavior.
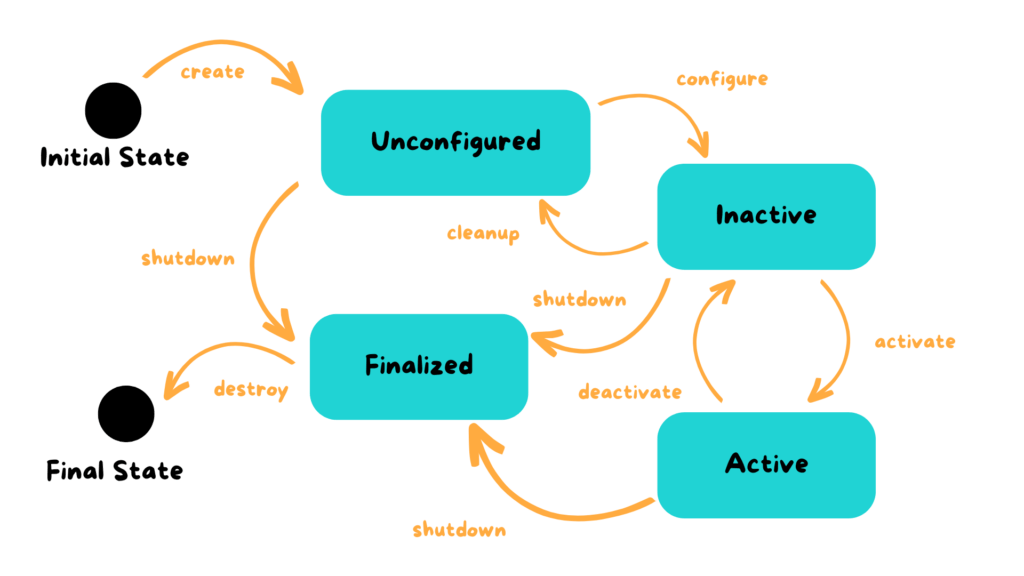
A Lifecycle Node – also known as a Managed Node – is a ROS 2 node that follows a structured life cycle composed of multiple operational phases.
When launched, the node starts in the Unconfigured state, meaning the code is loaded but resources are not yet initialized. From there, it can transition to the Inactive state, where the node is configured but not yet active—publishers, timers, and actions remain disabled. Then, with another transition, it enters the Active state, becoming fully operational, publishing data, and communicating with other system components.
When the node needs to stop or restart, it can move to the Deactivated or Finalized states, releasing resources in a safe and controlled manner.
These transitions can be triggered manually through the ROS 2 CLI or automatically by other nodes in the system. Each transition can be linked to a callback, a function defining what happens when the node enters or leaves a specific state.
This approach allows developers to orchestrate the system’s behavior predictably, preventing race conditions or initialization errors.
rclpy API.
					from rclpy.lifecycle import Node
from rclpy.lifecycle import State
from rclpy.lifecycle import TransitionCallbackReturn
import rclpy

class MyLifecycleNode(Node):

    def __init__(self):
        super().__init__('my_lifecycle_node')

    def on_configure(self, state: State):
        self.get_logger().info('Configuring...')
        return TransitionCallbackReturn.SUCCESS

    def on_activate(self, state: State):
        self.get_logger().info('Activating...')
        return TransitionCallbackReturn.SUCCESS

    def on_deactivate(self, state: State):
        self.get_logger().info('Deactivating...')
        return TransitionCallbackReturn.SUCCESS

    def on_cleanup(self, state: State):
        self.get_logger().info('Cleaning up...')
        return TransitionCallbackReturn.SUCCESS

    def on_shutdown(self, state: State):
        self.get_logger().info('Shutting down...')
        return TransitionCallbackReturn.SUCCESS


def main(args=None):
    rclpy.init(args=args)
    lc_node = MyLifecycleNode()
    rclpy.spin(lc_node)
    rclpy.shutdown()
					from rclpy.lifecycle import Node
from rclpy.lifecycle import State
from rclpy.lifecycle import TransitionCallbackReturn
import rclpy
These lines import all the necessary modules for working with Lifecycle Nodes in ROS 2.Node is the base class for all Lifecycle Nodes, State represents the current node state, and TransitionCallbackReturn is used to report the outcome of a transition.
class MyLifecycleNode(Node):
Here, we define a class called MyLifecycleNode that inherits from Node.
This inheritance gives our class all the functionalities of a managed Lifecycle Node.
					def __init__(self):
    super().__init__('my_lifecycle_node')
The constructor initializes the node and assigns it the name my_lifecycle_node, which is how it will appear in the ROS 2 system.
					def on_configure(self, state: State):
    self.get_logger().info('Configuring...')
    return TransitionCallbackReturn.SUCCESS
The on_configure() callback is executed when the node transitions from unconfigured to inactive.
This is where you typically load parameters, open connections, or initialize sensors and resources.
The return value communicates whether the transition succeeded.
					def on_activate(self, state: State):
    self.get_logger().info('Activating...')
    return TransitionCallbackReturn.SUCCESS
The on_activate() callback runs when the node becomes active, meaning it is now fully operational.
Here, the node starts publishing data, executing timers, or performing actions.
					def on_deactivate(self, state: State):
    self.get_logger().info('Deactivating...')
    return TransitionCallbackReturn.SUCCESS
on_deactivate() is triggered when the node transitions from active to inactive.
At this stage, publishers and periodic operations are suspended while keeping resources allocated.
					def on_cleanup(self, state: State):
    self.get_logger().info('Cleaning up...')
    return TransitionCallbackReturn.SUCCESS
The on_cleanup() callback releases resources and returns the node to the unconfigured state.
This is useful when you want to reconfigure a node without restarting the whole system.
					def on_shutdown(self, state: State):
    self.get_logger().info('Shutting down...')
    return TransitionCallbackReturn.SUCCESS
The on_shutdown() callback executes when the node is shutting down permanently.
Here, you can save data, close files, or safely disconnect hardware components.
					def main(args=None):
    rclpy.init(args=args)
    lc_node = MyLifecycleNode()
    rclpy.spin(lc_node)
    rclpy.shutdown()
The main() function initializes ROS 2, creates the node instance, keeps it running with rclpy.spin(), and shuts it down cleanly when finished.
Once the node is running, you can control its state directly from the terminal.
ROS 2 provides a dedicated CLI tool for managing Lifecycle Nodes, allowing you to configure, activate, deactivate, clean up, or shut down nodes easily.
For example, to manage a node named /my_lifecycle_node, you can use:
					ros2 lifecycle set /my_lifecycle_node configure
ros2 lifecycle set /my_lifecycle_node activate
ros2 lifecycle set /my_lifecycle_node deactivate
ros2 lifecycle set /my_lifecycle_node cleanup
ros2 lifecycle set /my_lifecycle_node shutdown
Each command triggers the corresponding callback defined in the code and moves the node to its new state.
To check the node’s current state, you can use:
ros2 lifecycle get /my_lifecycle_node
This management system makes it extremely easy to coordinate multiple nodes running simultaneously — a key advantage in distributed systems where modules must activate in the correct order or safely deactivate when required.
The introduction of Lifecycle Nodes makes ROS 2 far more mature and professional compared to its predecessors.
This feature enables predictable and controlled management of node behavior.
In real projects, this means sensors are never activated before the network is ready, actuators can be safely suspended, and resources are always released correctly — preventing memory leaks and race conditions.
A system that fully leverages Lifecycle Nodes is not only more stable and scalable but also easier to debug and maintain.
In industrial environments, this approach has become the standard for coordinating complex robotic systems with precision and determinism.
In research and prototyping, it provides the flexibility to test and modify behaviors without compromising overall system stability.
In this article, we explored how ROS 2 Lifecycle Nodes provide a structured and reliable way to manage the life cycle of nodes.
We saw how to create a managed node in Python, attach transition callbacks, and control its state directly through the ROS 2 CLI.
The ability to decide exactly when a node activates or deactivates is one of the foundations of building professional, safe, and dependable robots.
And this is just the beginning: in complex systems, Lifecycle Nodes are integrated with automatic supervisors, error-handling mechanisms, and recovery logic that make robots more autonomous and resilient.
If you want to learn how to design and build professional robotic systems leveraging the full power of ROS 2 Lifecycle Nodes, check out our complete ROS 2 course.
It includes step-by-step lessons, practical examples, and ready-to-use materials that will help you apply these techniques directly in your projects.
Scroll down to discover how to access the course today and take your ROS 2 skills to the next level.
Assemble your robot and get started to learn Robotics!