In this tutorial, we will explain how to use a push button with an Arduino board. We will walk through the correct wiring, provide a simple code example, and explain each step to help you understand how to detect button presses.
1 x Arduino Uno (or compatible board)
Jumper wires
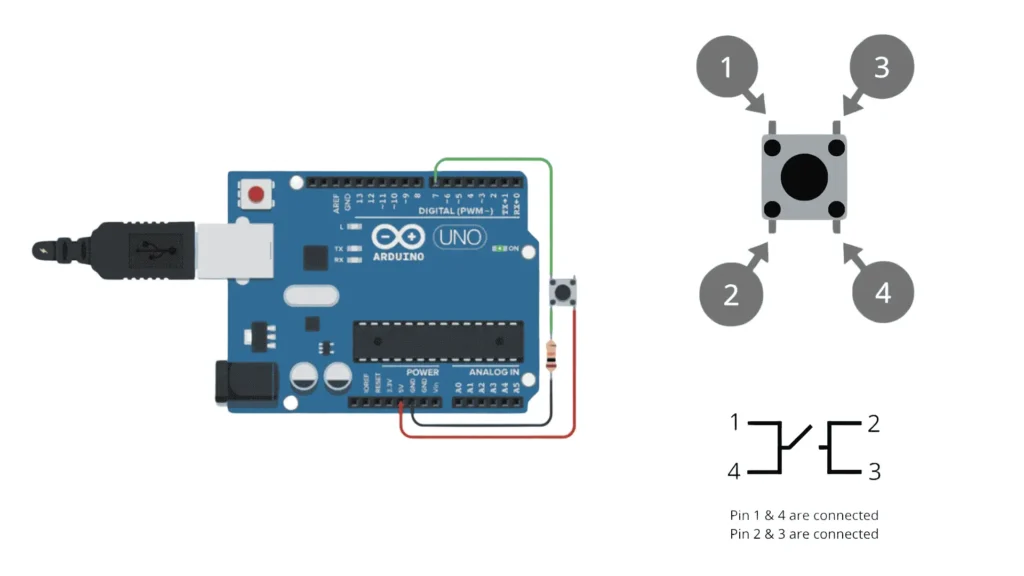
The button has four legs (two pairs connected internally). We only need to use two pins, one on each side. Connect one button pin to digital pin 7 on the Arduino and the one below it to GND via a 10kΩ pull-down resistor. So now connect the bottom right pin directly to 5V. This ensures that the input pin reads LOW when the button is not pressed and HIGH when it is pressed.
Basic wiring:

Below is a simple sketch that reads the button state and turns on the built-in LED when the button is pressed:
This is the complete code to use the button with Arduino:
					const int buttonPin = 7;     // Pin connected to the button
const int ledPin = 13;       // Built-in LED pin

int buttonState = 0;         // Variable to hold the button state

void setup() {
  pinMode(buttonPin, INPUT); // Set the button pin as input
  pinMode(ledPin, OUTPUT);   // Set the LED pin as output
}

void loop() {
  buttonState = digitalRead(buttonPin); // Read the state of the button

  if (buttonState == HIGH) {
    digitalWrite(ledPin, HIGH); // Turn on LED if button is pressed
  } else {
    digitalWrite(ledPin, LOW);  // Turn off LED otherwise
  }
}
Let’s review the code section by section:
const int buttonPin = 7;
Defines the pin connected to the button.
const int ledPin = 13;
Uses the built-in LED on most Arduino boards.
pinMode(...)
Sets up the pin modes for input and output.
digitalRead(...)
Reads the current state of the button (HIGH if pressed, LOW otherwise).
digitalWrite(...)
Turns the LED on or off based on the button state.
The LED never turns on
The LED stays on constantly
Assemble your robot and get started to learn Robotics!