Avvia la funzione loop(), che viene eseguita continuamente.

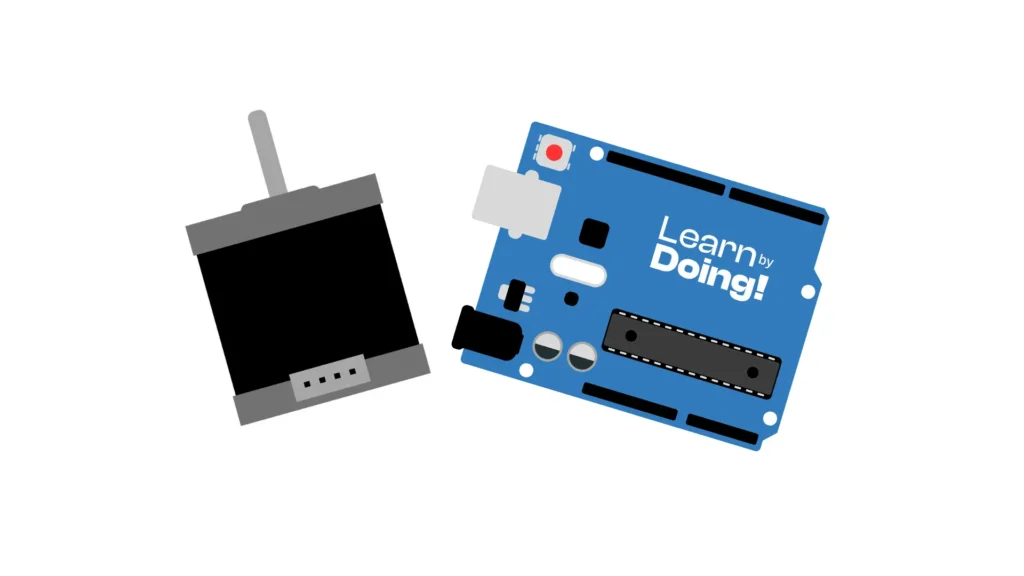
In this tutorial, we will walk through the essential steps required to program an Arduino Uno to control a NEMA 17 stepper motor. We will also cover in detail how to correctly wire all the components involved, ensuring a reliable and safe operation of the entire system.
The NEMA 17 is a type of stepper motor widely used in electronics, robotics, and 3D printing projects. The term NEMA 17 refers to the standard size of the motor’s faceplate, which measures 1.7 inches (43.2 mm) on each side.
This motor rotates in precise steps, typically 200 steps per revolution (1.8° per step), making it ideal for applications where accurate motion control is required.
Inside a NEMA 17 stepper motor are multiple electromagnetic windings arranged to produce discrete angular steps. By applying voltage to these coils in a specific sequence, the motor rotates by a fixed angle for each signal pulse received.
This controlled movement is managed by a driver (such as the A4988), which receives digital signals from the Arduino and converts them into the correct electrical sequence for the motor’s coils. This allows for precise and repeatable rotation, step by step.
The control is handled through two main pins connected to the Arduino:
DIR (direction): sets the rotation direction of the motor.
STEP (step): receives a pulse each time the motor should advance one step.
By adjusting the frequency of the signals sent to the STEP pin, you can control the rotation speed of the motor. Changing the logic level of the DIR pin will reverse the rotation direction.

1 x Arduino Uno (or compatible board)
1 x Stepper Motor Driver (e.g., A4988 or DRV8825)
Suitable power supply for the motor
Jumper wires
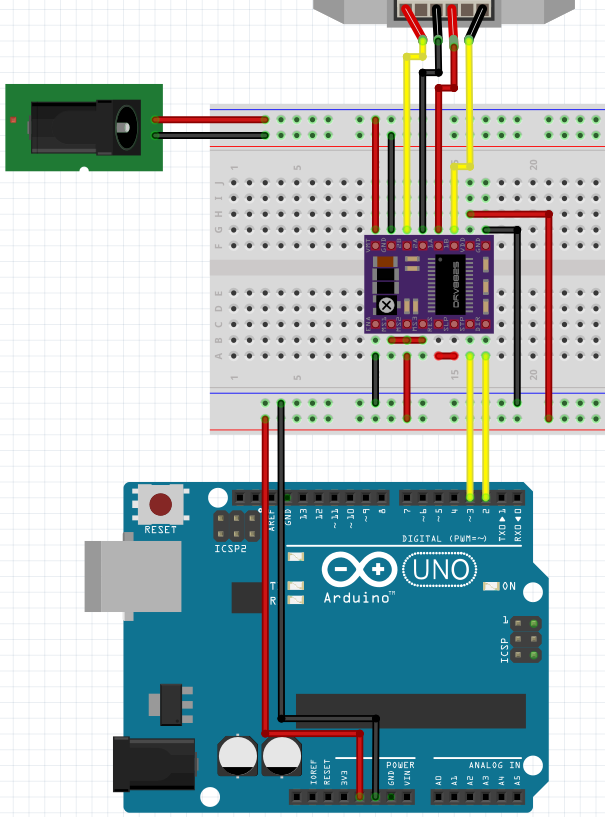
Once the wiring is complete, we move on to programming. We’ll use the Arduino Uno to send control signals to the A4988 driver, which in turn drives the NEMA 17 stepper motor. To simplify the handling of step (STEP) and direction (DIR) signals, we’ll use the AccelStepper library, which is far more flexible than the standard Stepper library.
Before uploading the code, make sure to install the AccelStepper library:
Ecco il codice Arduino completo per controllare il NEMA 17:
					#include <AccelStepper.h>

#define STEP_PIN 3
#define DIR_PIN 2

// Driver type compatible with A4988
AccelStepper stepper(AccelStepper::DRIVER, STEP_PIN, DIR_PIN);

void setup() {
  stepper.setMaxSpeed(1000);      // Sets the maximum speed (steps/sec)
  stepper.setAcceleration(500);    // Sets the acceleration (steps/sec²)
  stepper.moveTo(200);             // Number of steps to perform
}

void loop() {
  if (stepper.distanceToGo() == 0) {
    delay(500);                                  // Optional pause between reversals
    stepper.moveTo(-stepper.currentPosition());  // Change direction
  }
  stepper.run();  // Execute the movement
}
Let’s review the code section by section:
#include <AccelStepper.h>
					#define STEP_PIN 3
#define DIR_PIN 2
Definisce i pin digitali Arduino utilizzati per controllare il driver A4988:
STEP_PIN (3) invia gli impulsi per muovere il motore in avanti.
DIR_PIN (2) imposta la direzione di rotazione.
AccelStepper stepper(AccelStepper::DRIVER, STEP_PIN, DIR_PIN);
Crea un stepperoggetto
Utilizzando il DRIVERtipo compatibile con driver come A4988 e DRV8825,
specifica i pin STEP e DIR da utilizzare.
void setup() {
Avvia la funzione loop() , che viene eseguita continuamente.
stepper.setMaxSpeed(1000);
Imposta la velocità massima del motore a 1000 passi al secondo.
stepper.setAcceleration(500);
Imposta l’accelerazione a 500 passi al secondo quadrato per partenze e arresti più fluidi.
stepper.moveTo(200);
Comanda al motore di muoversi di 200 passi dalla posizione attuale.
void loop() {
Avvia la funzione loop(), che viene eseguita continuamente.
if (stepper.distanceToGo() == 0) {
Controlla se il motore ha raggiunto la destinazione (ovvero ha completato tutti i passaggi richiesti).
delay(500);
Fai una pausa di mezzo secondo prima di invertire la direzione. Questo aiuta a rendere il movimento più visibile e fluido.
stepper.moveTo(-stepper.currentPosition());
Inverti la direzione: se il motore era a +200, torna a -200 e così via.
					 }
  stepper.run();
stepper.run() è necessario per far avanzare il motore di un passo alla volta in base alla velocità e all’accelerazione impostate.
Motor does not move
Motor vibrates but doesn’t rotate
Driver overheats
Motor moves erratically
Assemble your robot and get started to learn Robotics!