
In this tutorial, you’ll learn how to connect and use an HC-SR04 ultrasonic sensor with an Arduino Uno board to measure the distance of an object in real time.
Ultrasonic sensors are widely used in robotics, home automation, and security systems because they can detect objects and measure distances without any physical contact, using high-frequency sound waves.
This guide will walk you through wiring the sensor to Arduino, explaining how it works, and writing a simple program to display live distance readings on the Arduino Serial Monitor.
1x Arduino Uno (or compatible board)
1x HC-SR04 ultrasonic sensor
4x Male-to-male jumper wires
1x Breadboard (optional but recommended for a tidy connection)
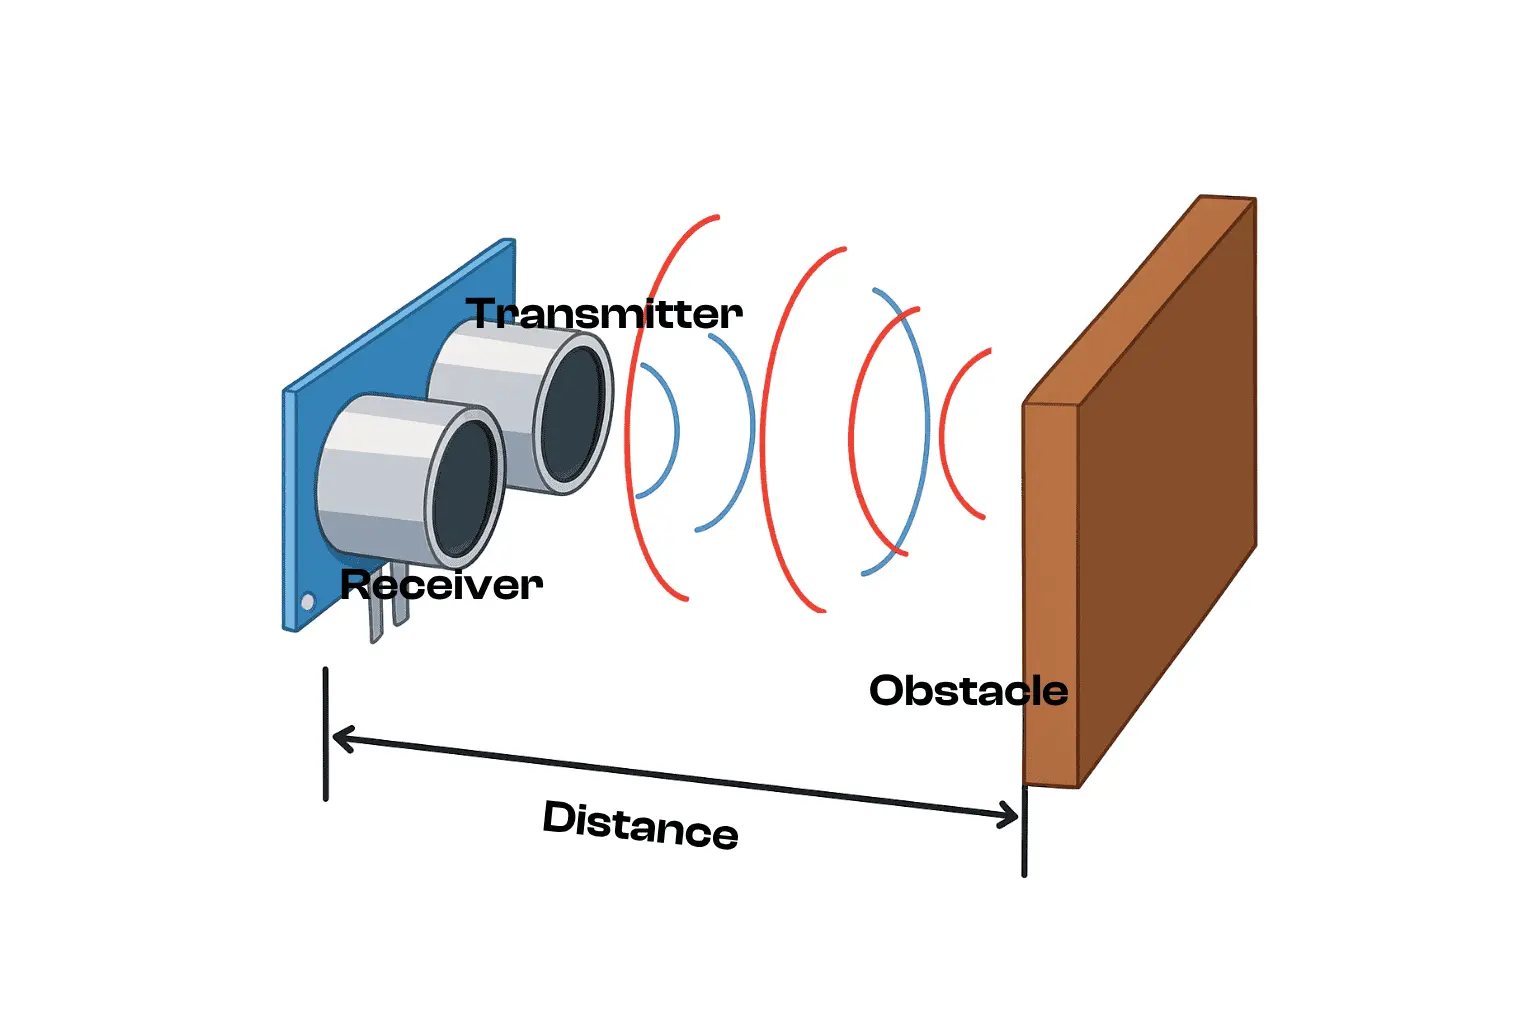
The HC-SR04 works by sending out an ultrasonic sound wave through its Trig pin. This wave travels through the air until it hits an object and bounces back. The reflected signal is received by the sensor’s Echo pin.
By measuring the time taken for the sound wave to return, the sensor can calculate the distance to the object using this formula:
Distance (cm)=2Time (μs)×0.0343
Note: The division by 2 accounts for the round-trip travel time (from the sensor to the object and back).
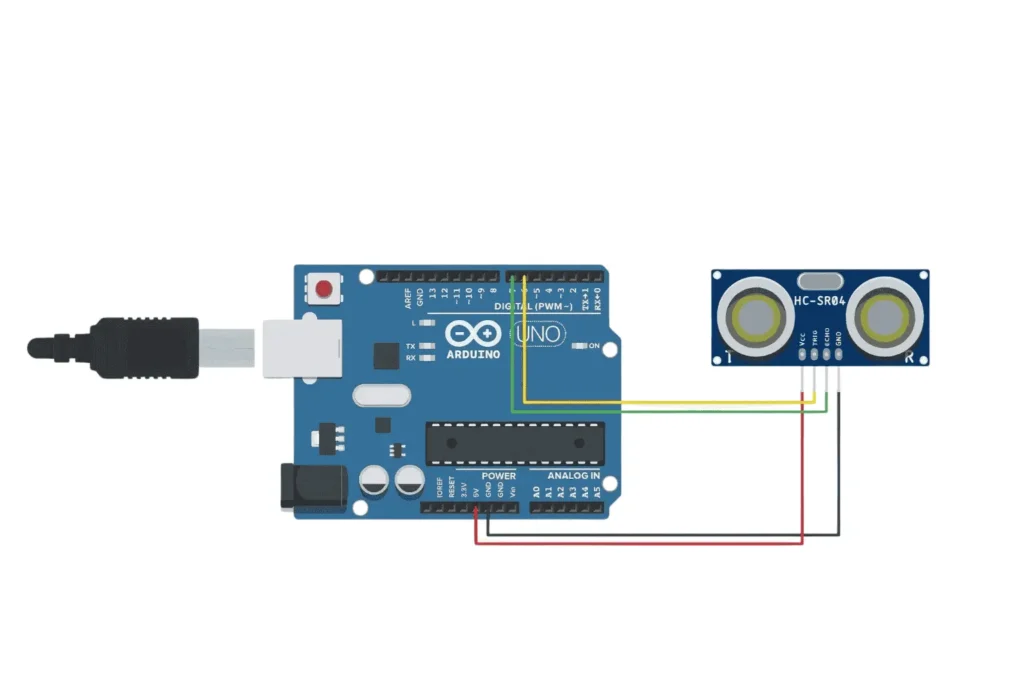
| HC-SR04 Pin | Arduino Pin |
|---|---|
| VCC | 5V |
| GND | GND |
| Trig | D6 |
| Echo | D7 |
					#define TRIG_PIN 6
#define ECHO_PIN 7

long duration;
float distance;

void setup() {
  Serial.begin(9600);
  pinMode(TRIG_PIN, OUTPUT);
  pinMode(ECHO_PIN, INPUT);
}

void loop() {
  // Send a 2-microsecond pulse to Trig pin
  digitalWrite(TRIG_PIN, LOW);
  delayMicroseconds(2);
  digitalWrite(TRIG_PIN, HIGH);
  delayMicroseconds(10);
  digitalWrite(TRIG_PIN, LOW);

  // Read the echo return time
  duration = pulseIn(ECHO_PIN, HIGH);

  // Calculate distance in centimeters
  distance = (duration * 0.0343) / 2;

  // Print the distance to the Serial Monitor
  Serial.print("Distance: ");
  Serial.print(distance);
  Serial.println(" cm");

  delay(500);
}
Let’s review the code section by section:
Assigns Arduino digital pins 6 and 7 to the Trig and Echo pins of the sensor.
					#define TRIG_PIN 6
#define ECHO_PIN 7
					long duration;
float distance;
duration will store the time (in microseconds) it takes for the echo to be received.
distance will store the calculated distance in centimeters.
					void setup() {
  Serial.begin(9600);
  pinMode(TRIG_PIN, OUTPUT);
  pinMode(ECHO_PIN, INPUT);
}
Initializes serial communication at 9600 bps for displaying data in the Serial Monitor.
Configures Trig as an output and Echo as an input.
Send Trigger Pulse
					digitalWrite(TRIG_PIN, LOW);
delayMicroseconds(2);
digitalWrite(TRIG_PIN, HIGH);
delayMicroseconds(10);
digitalWrite(TRIG_PIN, LOW);
Sends a short 10-microsecond HIGH pulse on the Trig pin to initiate a measurement.
Briefly sets it LOW before and after for signal stability.
Measure Echo Return Time
duration = pulseIn(ECHO_PIN, HIGH);
pulseIn measures the length of time the Echo pin stays HIGH, representing the round-trip time of the sound wave..Calculate Distance
distance = (duration * 0.0343) / 2;
Converts the measured time into distance using the speed of sound in air (0.0343 cm/μs).
Divides by 2 because the signal travels to the object and back.
Display Data
					Serial.print("Distance: ");
Serial.print(distance);
Serial.println(" cm");
Sends the measured distance to the Serial Monitor in centimeters.
Delay Before Next Reading
delay(500);
Pauses for half a second before repeating the measurement.
This simple project demonstrates how to use an HC-SR04 ultrasonic sensor to measure distances and display them in real time via an Arduino board. It’s a foundational project that can be easily expanded into more advanced applications such as obstacle-avoiding robots, parking sensors, security systems, and environmental monitors.
Once familiar with this basic setup, you can experiment by adjusting the measurement frequency, changing the trigger and echo pins, or integrating an LCD screen or LEDs for visual feedback.
Assemble your robot and get started to learn Robotics!