
In this tutorial, you’ll learn how to use a 16×2 LCD display with an I2C interface using the Adafruit_LiquidCrystal library. The code example shows how to display a counter that increments every second and blinks the backlight to create a visual effect.
When working with LCD screens and microcontrollers like Arduino, a common challenge is the number of pins required for communication. A standard 16×2 LCD display usually needs at least 6 digital pins to function properly, which can be quite limiting—especially when your project includes many other components.
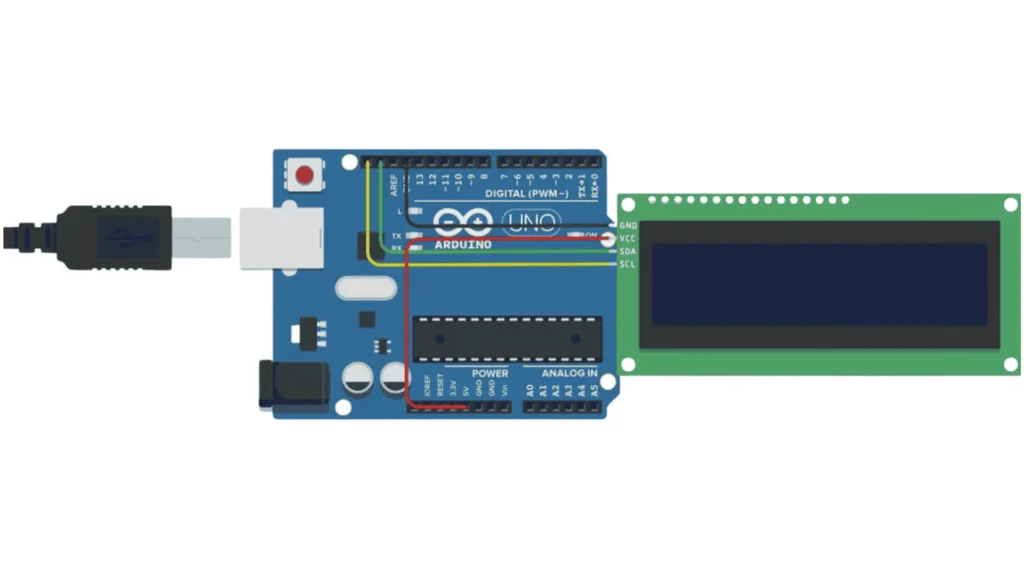
That’s where the I2C LCD comes in. I2C stands for Inter-Integrated Circuit, and it’s a communication protocol that allows multiple devices to communicate using just two wires:
An I2C LCD display is essentially a regular LCD screen that comes with a small I2C backpack module soldered on the back. This backpack handles all the parallel-to-serial conversion, so you only need two pins (plus power and ground) from your Arduino to control the entire screen.
Below you will find the complete code to use the humidity sensor:
					Upload this sketch to display a message:


#include <Wire.h>
#include <LiquidCrystal_I2C.h>

LiquidCrystal_I2C lcd(0x27, 16, 2);  // Set I2C address 0x27, 16 columns and 2 rows

void setup() {
  lcd.init();                       // Initialize the LCD
  lcd.backlight();                  // Turn on the backlight
  lcd.setCursor(0, 0);              // First column, first row
  lcd.print("Hello, World!");       // Print message on first row
  lcd.setCursor(0, 1);              // First column, second row
  lcd.print("I2C LCD Demo");        // Print message on second row
}

void loop() {
  // Nothing needed here
}
Let’s review the code section by section:
#include <Adafruit_LiquidCrystal.h>
Includes the Adafruit_LiquidCrystal library that allows you to control the I2C LCD easily.
Make sure to install this library via the Arduino Library Manager.
int seconds = 0;
seconds to store the number of seconds that have passed.
Adafruit_LiquidCrystal lcd_1(0);
Creates an LCD object named lcd_1.
The argument 0 is a reference ID (not the I2C address). In some versions, you might use lcd_1(0x27) or lcd_1(0x3F) depending on your I2C backpack.
					void setup() {
  lcd_1.begin(16, 2);           // Initialize 16x2 LCD
  lcd_1.print("hello world");   // Print on first row
}
lcd_1.begin(16, 2); initializes the LCD with 16 columns and 2 rows.
lcd_1.print("hello world"); prints the message starting from the top-left corner (default cursor position).
					lcd_1.setCursor(0, 1);
lcd_1.print(seconds);
These lines toggle the backlight on and off every second to create a blinking effect.
seconds += 1;
Increments the counter by 1 each time the loop runs (once per second).
Nothing appears on the LCD:
Text is garbled:
Assemble your robot and get started to learn Robotics!